Tuesday, December 21, 2010

Rice Bag

Just pop this rice bag in the microwave for 1-2 minutes to heat it up and then put it on those aching, sore muscles. It feels amazing. I absolutely luv mine and use it all the time, especially during that time of the month. Just follow this five minute video tutorial I created on how to make a rice bag. It's simple and inexpensive to make. Enjoy! I know you'll love it just as much as I do.

Sorry but I forgot to get a picture before I gave the rice bag away, so I found a variation of a rice bag on Etsy by Lil Bo & Co. As you watch the video you will notice my version is a square and doesn't have the one cut off corner.

Cost: $5
Time: 10-20 minutes
Materials:
-  1/4 yard flannel fabric
-  Matching thread
-  2 lb. bag of rice

Friday, December 17, 2010

Burlap Table Runner

Here is a great rustic table runner you can make for the holidays. It's easy and inexpensive.

Cost: $5
Time: 2-3hrs
Stencil Brush
Supplies:
  • Burlap
  • Fabric paint
  • Stencil Brush
  • Card stock
  • x-acto knife


Whenever I do a project I am always inspired by things I find in stores or on the internet. For this project I came across two photos that gave me the idea to create a table runner for thanksgiving. You will need to measure your table adding 8 - 12inches on each end. You do this so that the ends of the runner will hang off the table. Mine turned out a little short because I forgot to account for the table leaf; don't make the same mistake.
  1. Cut out fabric according to your measurements, sewing together pieces if you need to.{The width of my table runner was 15 inches. Add an 1/2 inch on each side. You will be turning under fabric to create a finished edge. The total should be 16 inches when you cut out the table runner.}
  2. Fold fabric in half, hot-dog style, placing right sides together.

   5.  Fold under raw edges ¼ inch; press.
   6.  Then fold over edge another ¼ inch; press.
   7.  Sew all around table runner at lining edge with foot.

How to embellishment the table runner is up to you. For my table runner I wanted it to say Thanksgiving. You can have it say something else or create designs. You just have to make them into a stencil first. Here is a great video on creating stencils. 
 
1.      On your computer decide on a font that you like best. For mine I used Georgia, 675pt. Then decide on a size, making sure your word will fit onto the table runner.
2.      Print each letter out on a separate piece of card stock.
3.      With an x-acto knife cut out the letters.
4.   Place where you would like the letters on the table  runner. Space each letter 1/4" apart.
5.      With a dry brush, dip it in the desired paint color and stencil in the letters. When you stencil you don’t do brush strokes, instead you dab the brush against the surface. Watch this video

Table Runner Ideas

Here are cute table runner ideas I found off Etsy. Most of them use burlap and are embellished with textures, embroidery, paint and other fabric. Burlap is a cheap fabric that can be dyed and embellished, making any table look amazing.

Moufelt, annajoyce, DreamsMadeEasy, BJelvgren, HenryandZoeStudio, Jadewink, Kainkain, SewnByDCC, ElkhornDesign, ArtoftheSalior, Kainkain

Saturday, November 20, 2010

Chiffon Flower

This is an adorable headband you can make at a cheap price and in less than 20mins! Choose to do 4 or 8 layers for your flower. Finished flower measurement is a 2 1/2" diameter. If you can use left over materials from previous projects.

Cost: $1 - $2
Time: 10-20 mins
    Materials
  • 4in. of Chiffon
  • 1mm stretch cording (buy according to head measurement)
  • Felt or Scrap Fabric
  • 3 pearl beads 
  • Print out pattern located at bottom of post

DIRECTIONS
 
STEP 1: Cut out circles 1 – 4 in Chiffon fabric. Cut out circle 5 in felt or scrap fabric.{OPTIONAL: if you want the fuller flower picture by the women above who is wearing the headband, cut circles 1 - 4 out twice, so that there are 8 layers instead of four.}

STEP 2: Singe the edges of fabric by holding near the flame as shown below. Practice on a scrap until you get the hang of it. Do each circle one at a time. Layer circles, 1 on top and 4 on the bottom. Secure the center with a pin. {If doing eight layers, layer them, starting from the top 1-1, 2-2, 3-3, 4-4}


STEP 3: Tie the cording ends into a tight double knot, like how you tie your shoes.


STEP 4: Sandwich the knotted cording in between the circle 5 cutouts. Set machine to a tight zigzag stitch. Zigzag, so the cording is in between the stitches.


STEP 5: Pin flower to the felt/scrap circle. Double thread a needle and tie a knot at the end. Make sure the bead will fit through the needle. Then Sew three pearl beads in the center, through the flower and felt/scrap.Knot the end when done.


STEP 6: Using fabric or craft glue, glue a piece of scrap fabric on backside to cover up stitches. DONE!


If the headband keeps on slipping out of your hair, use some bobby pins to secure it.

Thursday, November 18, 2010

Hair Acessories

Here are some adorable, affordable hair accessories I found on Etsy. Stay tuned because I will be showing you how to mimic some of these styles…or you can just go buy them.


Bethany Lorelle, Coco Rose Couture, Creations By Chelsea, Be Something New, Acute Designs, La Mya's Boutique, My Sweet Bee, Be Something New, Bethany Lorelle

Wednesday, November 17, 2010

Pillow Texture

Here are some fun ideas you can use to decorate your pillows. Adding texture can make a simple couch or bed fun and exciting.


Tuesday, November 16, 2010

Amy Power's Inspired Ideas for Christmas

Browse through this awesome online magazine to get Christmas Craft ideas! You'll luv it!

Tuesday, September 28, 2010

Tissue Paper Pom-Poms


When I moved into my college apartment, the girls previously there left these tissue paper balls that hung from the ceiling. They were really cool. Just recently while walking through Michaels I saw a kit on how to make them by Martha Stewart. I was unwilling to pay the price they asked for, so I went in search for it on her website. Note that Martha Stewart puts a lot of what she has published in books about sewing, food, etc online. So check her site first before purchasing a book or craft kit, it could save you  money. These pom-poms will work great for parties, little girls rooms, college dorms! They are cute, cheap and easy to make. Just follow Martha Stewart's tutorial

Monday, September 27, 2010

Making Pillow Cover w/Invisible Zipper

If you want to be able to take off pillow covering to wash it, this is the best method. With an invisible zipper the closing won’t look noticeable, but appear like a regular seam.

1.      Measure pillow, adding seam allowances.


2.      Transfer measurements to fabric and cut out two.
3.      Optional: Add embellishment to right sides of fabric pieces.
4.      Attach Invisible Zipper: Zipper packages will have instructions on how to attach. Note that you need a special foot on machine to attach an invisible zipper. Watch this video on how to do it.
5.      Place right sides together, pin around edges.
6.      Sew along the three edges, leaving zipper edge unzipped.
7.      Zigzag or serge around edges within seam allowances. Trim and press seams.
8.      Pull pillow covering right-sides out, poking out corners.
9.      Place pillow inside pillow covering and zip shut. YOUR FINISHED!

Flower Pillow Embellishment


    Got inpiration for this project from a picture of this flower I took while at
    the National Botanical Garden. This is a simple project any beginning
    sewer can do.


        1.    Cut 3-4 inch bias strips.
   
  2. Sew those strips together, making one very long strip. Needed length will vary depending on pillow size and on the amount of layers you want. For my 16x16 pillow my bias strip was 6-8 yards, making 8 layers.


    3.  Mark center of pillow with chalk or erasable fabric marker.
    4.  Gather a 2ft section of the strip and pin onto front panel of pillow, working from the outside spiraling to the center. Sew with regular stitch.


    5. Repeat step 4, overlapping the previous circle 2-3 inches till you have reached the center and are finished. TIP: the smaller the circle the more gathers you will need. If there is not enough gathers the strip will stand straight up, instead of lay down flat.


FINISHING TIP: Think about a rose and how tight the petals are in the center, that’s the look we are going for. After getting my strip in place to the desired look, I zigzagged the center, but made sure my gathered strip would hide the zigzag stitching. This will be semi-difficult to sew because of the small space. Hand stitch the center if it is too difficult to get the machine in there.


Thursday, September 23, 2010

Make Your Own Ombray Fabric


Ombray: dyeing technique where similar color tones are used to go from light to dark. (ref

For this project I will be using white cotton muslin, $1.49 a yard at Jo-Ann’s Fabric. Fabric needs to be white or your colors will not come out the same as the dye packet. I will be dyeing the fabric in three different dye baths. For this project I used Tangerine Rit dye and Fire Red iDye. Jo-Ann’s Fabrics carries Rit, Dylon, iDye, etc.  I saw no difference in performance of the different brands; each did well. So just choose which ever colors you like.

Follow the directions on the dye packet, using the bucket method, NOT the washer method.

STEP 1
  • Soak entire piece of fabric in the bath.
  • [TIP: Water amount and length of time will after the concentration of your color. If you want it lighter dilute the bath and leave the fabric in for less time. Vice versa if you want it darker.]
  • Rinse fabric till most of the dye is out. Don’t worry about trying to rinse it clear till the end of the third step.


STEP 2
  • Mix up Fire Red iDye. Take half of it and combine it with half of the Tangerine bath.
  • Take 2/3 of the fabric and soak it in the bath, letting 1/3 of the fabric hang out of the bucket.
  • Rinse.


STEP 3
  • Take 1/3 of the fabric and put it in the pure Fire Red bath, letting 2/3 of the fabric hang out of the bucket.
  • Rinse till water runs clear. May have to run it through the washer. If so add 1/3 vinegar and 1/3 salt to load, will set the color so it won’t run in future washings.


Tuesday, September 21, 2010

Find Discounted Pillows

Buying pillows from craft stores can be pricey, costing $7 for a small pillow. For my Frenzy Fray pillow project I found 16x16 inch pillows in the clearance isle at Wal-Mart $2 each! SIDE STORY: I was hit on by a very bold man while shopping for those pillows...note to all you ladies, don't smile at strange men. For some reason they think its a invite to come hit on you, when really you smiled out of awkwardness because they were staring at you.... Anyways, the pillows are a bright pink, but that doesn't matter when you make a pillow slip. Another great place to look for discounted pillows are thrift shops (Goodwill, DI, etc.). And if you want to buy pillows from any craft store, I recommend holding out for a coupon. Lately, places like JoAnn's Fabrics are having 40% off coupons every other week. So just be patient and save!

Fabric Frenzy Fray Texture

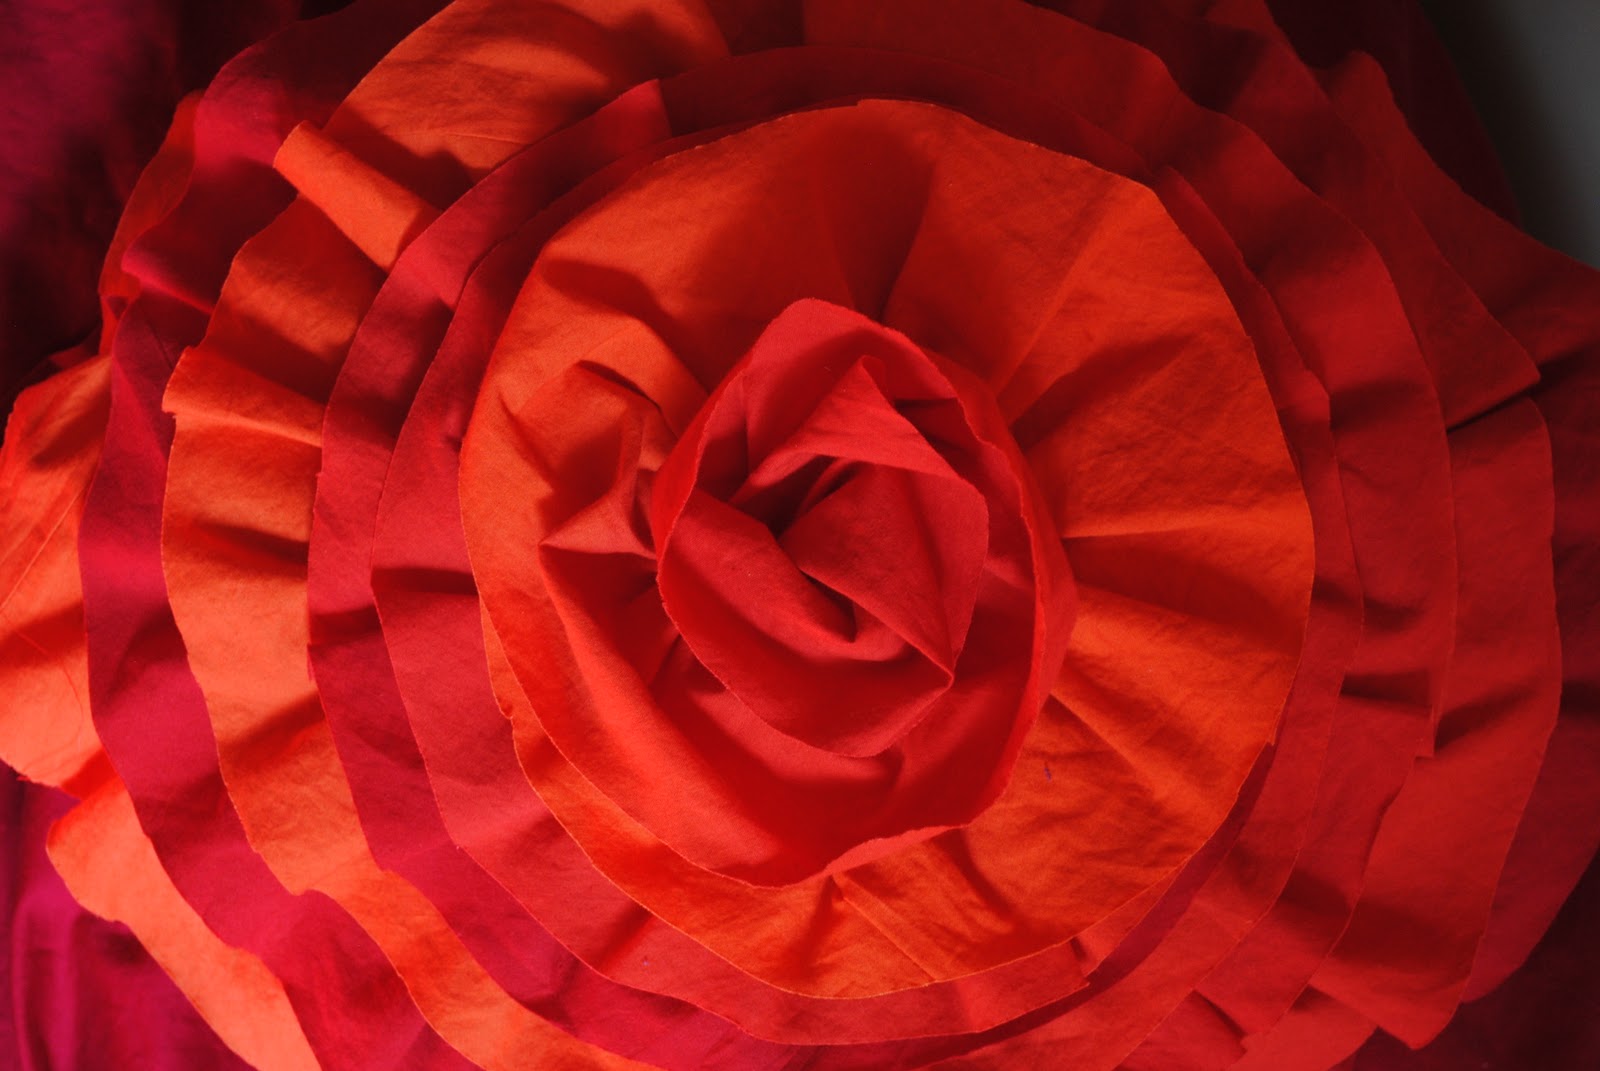
I went to an art festival in Washington DC a couple weeks ago. A lady there made these beautiful pillows using a fun texture. She shared how she did it, so now I am sharing it with you, with my own twist.

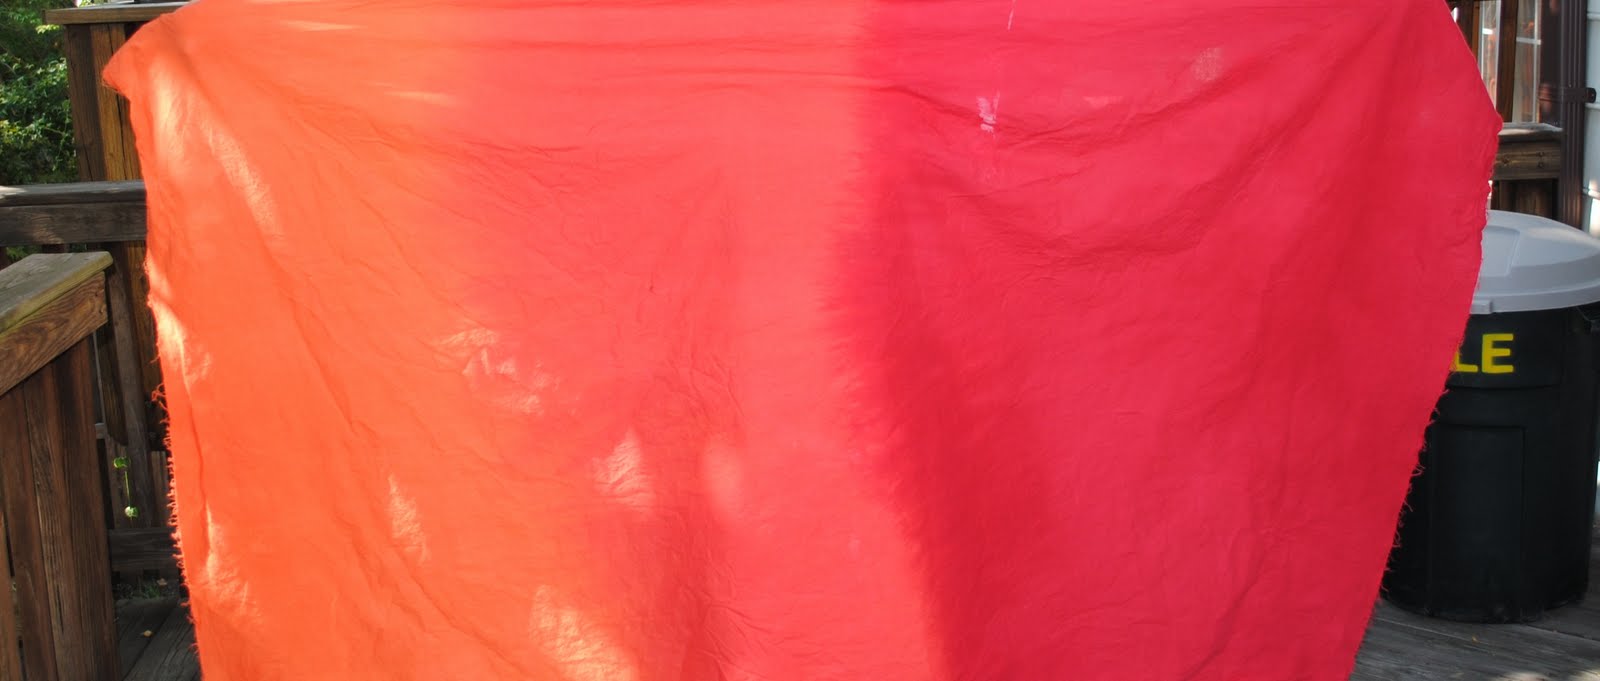
This is a great project to use up all those scraps you have taking up space. This is great technique for home décor projects (pillows, blankets). You will need 5 different types of fabrics.

Step 1

Cut your 5 pieces of fabric to the specification of your pillow or any other thing you may be using this technique for.


Step 2

Layer the 5 pieces of fabric, putting the fabric you prefer the most on top.

Step 3

After lining up all the edges pin the layers so that they will not shift while sewing.
Step 4

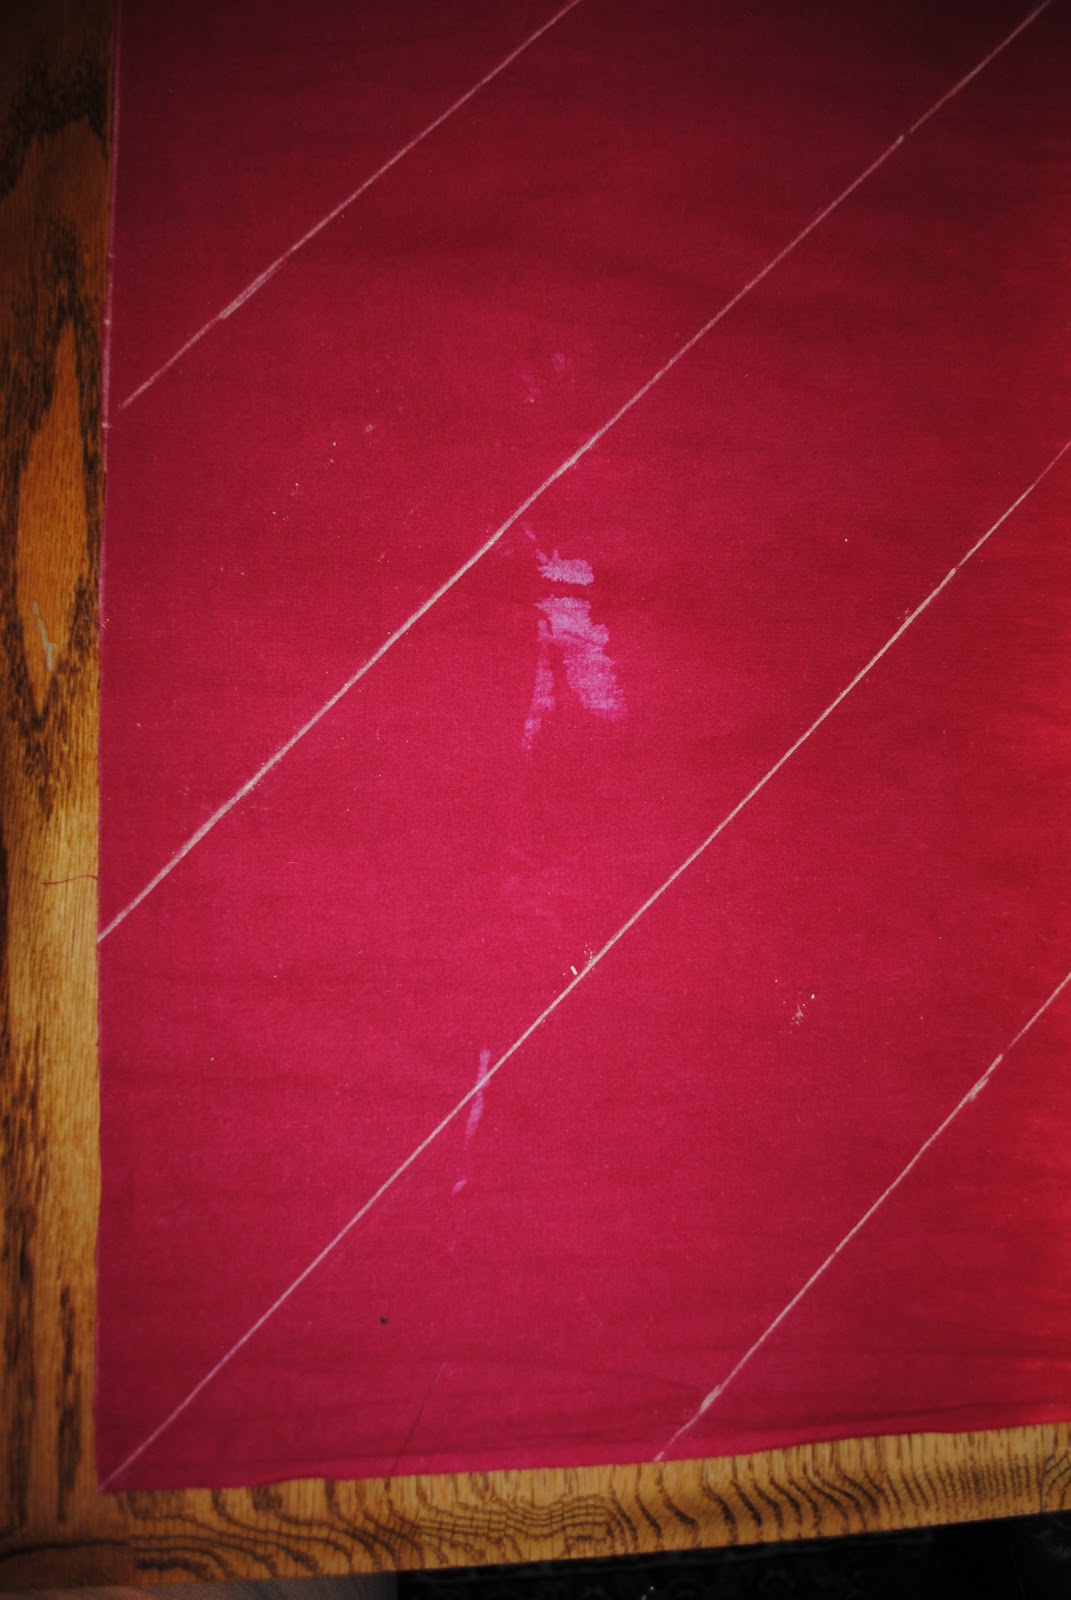
With chalk draw lines along the bias grain of the fabric. (Never use a pen, can stain fabric. Invest in sewing chalk or erasable fabric markers. Can be found at any Joann’s) Visit this site to understand bias grain.


Step 5

Sew along the chalk lines with a normal running stitch.


Step 6

Cut through four layers in between the sewn lines, down the middle. DO NOT cut through the bottom fifth layer. Fact: fabric won't or will minimally fray when cut along bias.


Step 7

OPTIONAL: Take a needle and thread, periodically tacking the fabric. Once put through the washer and dryer, take out those stitches. Fabric will stay in place. This will add more interest.


Step 8

Baste around all the edges of you fabric piece. (This will help prevent fraying where you don’t want it to)

Step 9


Put the fabric through a cycle in the washing machine and in the dryer. Continue to wash if you want it to be more frayed.


FINISHED!!!

Wednesday, September 8, 2010

Wise Craft Fabric Flower


This is a great, easy fabric flower anyone could make. I used it to embellish a purse I made for a friend. This tutorial is by Wise Craft. I totally forgot to take a picture of it before I gave it my friend and she is now currently in Ukraine. For my flower I took scrap fabric that complimented the purse and used a rhinestone button to embellish it. Very Cute!

Martha Stewart Silk Flowers

The Martha Stewart website is a great resource to find free and cute craft tips. I came across this tutorial and just luv it! Click on the link so you can follow the tutorial. Silk Flower

Sunday, August 15, 2010

Anthropologie Headbands

Found these headbands while shopping at Anthropologie. Cost: $32. A little spendy for bargain shoppers like me, but this classy, beaded band can really dress up an outfit. I absolutely loved them and am seriously contemplating purchasing one.


Going In Circles

Laureate

Wednesday, July 7, 2010

Free Sewing Patterns

I am a big fan of Amy Butler's fabrics, they are really cute. Check out her site. She has free patterns you can download as a pdf of bags, quilts, crafts and clothing. Trust me you'll LOVE it!